Arc D - St. Andral's Feast
An adventure for five 2nd-level heroes.
Arc Summary
In this arc, the heroes escort Ireena Kolyanovna to St. Andral's Church in Vallaki, fulfilling their vow to her brother, Ismark. However, Father Lucian, the church's priest, informs them that the bones of Saint Andral—the source of the church's protective magic—have recently been stolen, placing its wards and parishioners at risk.
The heroes have until the night before the Feast of St. Andral to identify the thief (the church groundskeeper, Milivoj), track down the bones to their hiding place (the Vallaki coffin maker's shop), and return them to their rightful place in the church. Their mission will bring them into direct conflict with Volenta Popofsky, Strahd's most sadistic vampiric bride, and her vampiric minions.
Can the heroes defeat Volenta's plan and restore the church's protection? Or will the church be lost in darkness and blood, its flickering light snuffed out in the shadows?
The heroes can earn up to 4 Victories by
- Finding the location of St. Andral's bones (montage, 1 Victory);
- Defeating Volenta and her vampire spawn in the coffin maker's shop to retrieve the bones (combat, 1-2 Victories); and
- Successfully arguing for mercy at Henrik and Milivoj's trial (negotiation, 1 Victory).
Content Warnings
This load-bearing content can't be removed or altered without significantly changing the arc:
- Oppressive criminal legal proceedings (the trial)
- Execution (the "default outcome" if the heroes don't intervene in the trial, or if the negotiation goes wildly wrong)
- Children in poverty (Milivoj's siblings; provides critical motivation for Milivoj to steal the bones)
This content is present, but can be removed or reworked without much effort:
- Young people in danger (Milivoj, 19)
- Neglect of children (Milivoj's siblings; can be reworked by having Milivoj's parents dead instead of dependent on dream pastries)
- Branding (as a possible punishment at the trial)
- Flogging (as a possible punishment at the trial)
- Amputation/limb loss (as a possible punishment at the trial)
- Fire (as revenge, if the heroes fail to defeat Volenta)
- Decapitation and evisceration (as revenge, if the heroes fail to defeat Volenta)
D1. St. Andral's Church
This scene takes place in Chapter 5: Area N1.
If the heroes bring Ireena to St. Andral's Church on their first night in Vallaki (i.e., "day zero" in Vallaki), they arrive to find Father Lucian finishing a service to his congregation. After giving reassurances to Willemina Rikalovna (see Arc C - Into the Valley for more information about Willemina), Father Lucian welcomes the heroes and Ireena to the church and offers his assistance.
If told that Ireena hopes to find sanctuary at the church, Father Lucian is glad to offer her a pallet to sleep on in the chapel. After Ireena offers to compensate him for his kindness, Father Lucian considers her request, then invites her to assist with Yeska's chores and education for the duration of her stay—a request which Ireena graciously accepts.
On Hektavr 23/Neyavr 9, the morning after St. Andral's bones are stolen as described below, Ireena visits the heroes at the Blue Water Inn as described in Arc C - Into the Valley and asks them to visit the church to speak with Father Lucian about an "incident." (Father Lucian has asked her not to speak of the incident outside of the church, for fear of raising a panic.) The remainder of this arc then proceeds normally; alter dialogue where appropriate to reflect Ireena's established presence at the church.
The church is largely as described in N1. St. Andral's Church (p. 97).
If a hero possesses the sunrise medallion, it glows and shines in the direction of the church's doors when the heroes first approach. If the hero shows the sunrise medallion to Father Lucian, he recognizes it as a symbol of the Lady of Morning, and grows warmer and friendlier toward that hero.
The church's occupants follow the following schedule unless interrupted:
- At dawn, Yeska joins Father Lucian for prayers in the chapel and assists him in preparing breakfast.
- In the morning, Yeska runs errands around Vallaki while Father Lucian sweeps the chapel, dusts the pews, polishes the altar, and tidies up the kitchen.
- In the afternoon, Father Lucian teaches Yeska how to read, and educates him in basic history and theology.
- In the evening, with Yeska's assistance, Father Lucian leads the congregation in prayer and delivers a sermon promising sanctuary and comfort.
Roleplaying Information
Resonance. Father Lucian should inspire gratitude with his hospitality, flattery with his willingness to listen and empathize, comfort with his warmth, serenity, and wisdom, and sympathy for his anxiety regarding the missing bones and the safety of his congregation.
Emotions. Father Lucian’s most frequent emotions are thoughtfulness, hopefulness, concern, and compassion.
Motivations. Father Lucian wants to keep Vallaki's spirits up, to keep the church a place of sanctuary and comfort, and to raise Yeska as best he can.
Inspirations. When playing Father Lucian, channel Uncle Iroh (Avatar: The Last Airbender), Michael Carpenter and Father Forthill (The Dresden Files), and Mr. Rogers (Mr. Rogers' Neighborhood).
Character Information
Persona. To strangers, Father Lucian is a serene, humble, and compassionate priest who is always happy to share a word of praise or a few pearls of wisdom. To those he trusts, Father Lucian is a dedicated and stalwart defender of his community, who nonetheless worries about his ability to keep his congregants safe. Deep down, Father Lucian harbors a twinge of doubt about the Lady of Morning's providence and power, wondering if Strahd's awakening is a test of Barovians' faith or a sign that the land is forsaken forever.
Morale. In a fight, Father Lucian would prefer to dissuade his attackers, surrendering peacefully if necessary to avoid unnecessary bloodshed. However, if an innocent life or the members of his congregation were threatened, he would fight to the death with a prayer on his lips and peace in his heart.
Relationships. Father Lucian is a mentor and father figure to the orphan Yeska, the employer of the groundskeeper Milivoj, the brother of Baroness Lydia Petrovna, and the distant descendant of Natalya Petrovna, an ancient cleric of the Lady of Morning whose remains are kept in the catacombs of Castle Ravenloft. (The family doesn't have a family name, but eldest sons' names alternate between Lucian/Lukyan and Pyotr—Father Lucian's father was Pyotr Lukyanovich, his father was Lukyan Petrovich, and so on.)
Though he helped House Von Zarovich ascend to power, St. Andral ironically remained a fierce and powerful foe of the undead for all his life. As Most High Priest of the Lady's church, Andral directed fierce crusades against undead that lurked in the dark places of King Barov's kingdom, rooting them out wherever they could be found.
So great was his hatred of undeath that, in his final hours of life, St. Andral vowed that his resting place would forever be a sanctuary from the forces of darkness. Since then, his bones have been interred in the crypt beneath Vallaki's church, its priests performing an annual ritual at dawn each year on his holy day - the day of St. Andral's Feast. So long as this rite is completed, the church remains hallowed ground for an additional year.
When Strahd awoke from his recent hibernation, his vampiric bride Volenta Popofsky decided to impress him the only way she knew how: with a wanton display of suffering, carnage, and terror. Where better, she thought, than a gruesome massacre at St. Andral's Church on the night of its most holy feast?
It was a dark and windy night when Volenta paid a visit to Henrik van der Voort, Vallaki's coffin-maker. Finding a macabre pleasure in the setting, and finding the lonely Henrik a perfect target for her plots, Volenta politely threatened to burn his shop to the ground unless he allowed her to use it as a base for her machinations.
A terrified Henrik soon capitulated, and Volenta established a link with the teleportation brazier in Castle Ravenloft's dungeons. Using that link, she summoned several feral vampire spawn—former members of Doru's rebellion driven mad with bloodlust—and crates filled with grave dirt to rest in.
A remnant of an older age, Volenta knew that St. Andral's remains provided the church with its blessed protection. She commanded Henrik to find and steal those bones before the night of St. Andral's Feast—by any means necessary.
Given his profession, Henrik had encountered Milivoj—the church's groundskeeper—on more than one occasion. He knew that Milivoj was familiar with the church's occupants and layout, that Milivoj thought little of the Lady's faith, and—most importantly—that Milivoj had a host of younger siblings he was desperate to feed.
Digging into his own savings for funds, Henrik approached Milivoj with a story and an offer. St. Andral, Henrik claimed, was an ancestor of Henrik's own family—and one whose remains Henrik was anxious to claim. "In these darkened times," Henrik said somberly, "we all want our families close at hand."
Henrik told Milivoj his family had searched for St. Andral's remains for centuries—but that only recently had he learned them to be located somewhere in the church. Doubtless, he claimed, the good Father Lucian would be loathe to surrender such a relic, even though their only true value was sentimental.
That was where Milivoj came in. In exchange for a substantial payment, Milivoj would find and retrieve Andral's remains. Old legends, Henrik noted, indicated that those remains carried St. Andral's blessing, sanctifying the church from evil—though he personally doubted they were true. He suggested Milivoj use those legends, however, as an excuse to inquire about the remains' location, either from Father Lucian or from Yeska, the altar server. ("Of course," Henrik noted with a dry chuckle, "I'm fairly certain I've seen Izek Strazni entering the church, so perhaps those legends have lost their luster for good cause, eh?")
Milivoj, eager to secure funds to care for his siblings, was easily convinced to steal those "moldy old relics" and soon agreed to Henrik's offer. He knew Yeska, a recent orphan, was a timid and fearful child who looked to Father Lucian for safety and comfort. Though he couldn't escape the guilt he felt for leveraging the child's fear, Milivoj decided that a few nights of Yeska's nightmares were a worthy price to pay to ensure his own family had food to eat.
Six days later, shortly before Yeska's lessons with Father Lucian, Milivoj wondered aloud in front of the child whether Strahd might attack the church with an army of vampires and demons. "I heard vampires hate the sun," Milivoj said darkly as Yeska's face paled. "And if the Devil came here, what could we possibly do to stop him?"
When Yeska's lesson began shortly thereafter, Milivoj eavesdropped outside the door—and silently cheered when Father Lucian revealed the bones' location beneath the altar. That same night, a cloaked and hooded Milivoj returned to the church with his shovel in hand, creeping through the darkened chapel and forcing open the crypt that lurked below.
But a splintering floorboard betrayed him—and when Milivoj emerged from the crypt, Father Lucian emerged to block the exit. Without recognizing him, Father Lucian demanded the intruder reveal his face and relinquish what he had stolen. Milivoj panicked and fled through one of the church's glass windows, shattering it. Milivoj then delivered the bones to Henrik, who paid him.
Yeska doesn't yet know that the bones were stolen. Instead, Father Lucian told them only that a broken tree branch had crashed through the window, breaking the glass and damaging the floor. The following dawn, Father Lucian sent Yeska to Henrik's shop to obtain planks and nails for the repair, which Henrik delivered personally to scope out whether Lucian suspected his involvement.
Father Lucian doesn't know who stole the bones or why. Though he gently interrogated Yeska as to whether she told anyone about the bones, Yeska truthfully told him that she hadn't. Father Lucian has been unable to discern more from his own brief inspection of the crime scene. With the date of reconsecration fast approaching, however, he fears the worst.
While the church is hallowed ground, creatures with the Infernal, Abyssal, or Undead keywords can't enter the area, nor can such creatures charm, frighten, or possess creatures within it. Any creature charmed, frightened, or possessed by such a creature is no longer charmed, frightened, or possessed upon entering the area. Dead bodies interred in the area can't become undead.
Heroes don't have keywords; revenant and devil heroes can enter the church freely and safely. If questioned, Father Lucian states that the Lady's grace extends to all beings, and that her saint's wrath only falls on those fiends and undead driven by malice.
D1a. Entering the Church
When the heroes first move to enter the church after the bones have been stolen, Henrik van der Voort emerges at the same time, forcing one of the heroes to make a medium Agility test or crash into him.
Whether the hero succeeds or fails, the near-impact makes Henrik trip, sending him tumbling to the ground. As he does, he loses his hold on a bundle of nails and planks held in his arms, which scatter across the stairs and earth below. The farsighted Henrik also loses his pair of half-cracked spectacles in the fall, which land across the steps a short ways beneath him.
The heroes can help Henrik collect his glasses, nails, and planks as he scrambles helplessly to find them. If they do, he thanks them profusely, dabbing at his face and hands with a slightly soiled handkerchief. He is willing to share the following information if directly asked:
- His name is Henrik van der Voort, and he is Vallaki's resident coffin-maker and occasional carpenter.
- Father Lucian asked him to visit to deliver some tools and supplies to repair some damage to the floor caused by a falling tree branch the previous night.
- His shop can be found at the south end of Arasek Stockyard. "Although," Henrik jokes awkwardly, "I do hope you won't need my services too soon."
Henrik then excuses himself and departs to return to his shop.
D1b. The Chapel
When the heroes first enter this area, read:
A dozen ornate candelabras bathe rows of well-kept pews in candlelight, casting a soft luminescence that touches every corner of this chapel. At the far end of the room, a wooden altar stands proudly, carved with a proud sunburst with rays thrusting forth in cheery defiance. Six tall windows flank the altar, though one appears to have been broken, with glass shards lining its dark iron pane like jagged teeth.
A broad-shouldered, black-haired young man stands atop a small stepladder before the broken window, nailing a tarp into place to cover it as a young child sweeps the chapel floor not far away. A middle-aged priest, with graying hair and crisp, clean vestments watches them work from the pews, holding a broom of his own and looking lost in thought.
The young man is Milivoj (he/him). The priest is Father Lucian Petrovich (he/him). The child is Yeska (she/they/he).
When the heroes first meet Father Lucian, he greets them warmly, recognizing them as newcomers to Vallaki, welcoming them to St. Andral's Church, and asking if they have come seeking fellowship or to pray to the Lady of Morning.
After the heroes have exchanged pleasantries, Milivoj dismounts his stepladder and returns it to Father Lucian. The following exchange then takes place, giving the heroes generous time and opportunity to interrupt and respond:
- Upon noticing the heroes, Milivoj immediately scowls, and asks, "Father, are these outsiders bothering you? I can ask them to leave."
- If the heroes say nothing, Father Lucian chides Milivoj, noting that, "In these dark times, it's never been more important to be hospitable to others."
- If rebuffed, Milivoj retorts: "You can't be too sure about strangers. I thought the town gates were supposed to be closed. They could be vampires, or worse." He then glowers at the heroes, and asks, "Unless you have some way of proving that you're not?"
Milivoj is eager to prevent further investigation of the church, and hopes to persuade Father Lucian to drive the heroes away. However, he's not willing to look suspicious, and drops the issue if the heroes or Father Lucian push back. "You can't be too careful," he mumbles. "Be safe, Father." He then departs.
Once Milivoj leaves, if Father Lucian is informed that Ireena is seeking sanctuary in the church from Strahd or other monsters, he first ensures that no other congregants are present—shooing away Yeska if present—and swears the heroes to secrecy.
If the heroes agree not to spread his words beyond the church, Father Lucian sorrowfully informs them that, while he would love nothing more than to extend Ireena an offer of permanent shelter, recent events have left the church's wards in a precarious state. He can also share the following additional information at the heroes' prompting:
- The church is ordinarily hallowed ground. This magical ward prevents fiends and undead from entering the church, and keeps them from magically charming, frightening, or possessing those within it.
- The source of this protection is the crypt of Saint Andral, which has historically held the blessed bones of Andral himself, the founder of Vallaki's church and a great saint of the Lady of Morning.
- Originally, only Father Lucian knew of the bones' existence. However, after news of the siege of Barovia reached Vallaki a few days ago, he shared the knowledge of the bones with Yeska to put the fearful child at ease.
- To retain the church's protection, Father Lucian must invoke a particular rite of protection over Saint Andral's bones once every year, at dawn on the morning of Saint Andral's Feast—a holy day that memorializes Andral's life.
- If the rite cannot be carried out at that time, the wards will fall until the rite is completed on a subsequent dawn.
- Last night, someone broke into the church's crypt and stole St. Andral's bones, damaging the floorboards behind the altar and escaping through a window. Without the bones, Father Lucian can't complete the protective rite, and the wards will fall at dawn on the day of St. Andral's Feast.
- Father Lucian is fearful that some fell creature or wicked soul has manufactured this crisis as an opportunity to cause his congregation harm; though the Baron is confident that no monsters could breach Vallaki's walls, Father Lucian fears that the town is not as safe as it appears.
Father Lucian can also share the date of St. Andral's Feast, which will take place on Hektavr 28/Neyavr 14 (the day before the next full moon). He has not reported the theft of the bones for fear of the distress that the news might cause. He does not suspect Milivoj of stealing the bones either, having no reason to do so.
If the heroes express an interest in doing so, Father Lucian is glad to allow them to inspect the crime scene—having made neither heads nor tails of it himself—and to interview Yeska, so long as they promise to be patient and gentle with the child.
If the heroes ask for the identities of other possible witnesses, Father Lucian notes that the only other employee of the church is the groundskeeper, Milivoj. Father Lucian can give the heroes directions to Milivoj’s house, which is located in the northwestern quarter of Vallaki.
Father Lucian accompanies the heroes as they complete their investigation, answering additional questions when asked. If the heroes' investigation takes them beyond the church, he offers to join them and asks Yeska to attend the chapel in his absence. (He takes personal responsibility for the bones' disappearance, and—given his connections across the town and his service to the Lady of Morning—wishes to assist the heroes in recovering them.) If the heroes decline his offer, he offers them a vial of Holy Water: it's not much, he says, but maybe it'll help if the holy relic has been desecrated somehow.
If your heroes have no way of dealing holy damage and don't accept Father Lucian's help, the combat encounter in #D4c. Volenta's Trap will be much more difficult. If there's no conduit or censor among your heroes, and they don't already have some holy water, consider offering two vials instead of just one.
The heroes must now undertake a montage test to investigate the missing bones.
Montage Test Difficulty: Easy
Rewards: 1 Victory
| Heroes | Success Limit | Failure Limit |
|---|---|---|
| 3 | 3 | 3 |
| 4 | 4 | 4 |
| 5 | 5 | 5 |
| 6 | 6 | 6 |
Notes: This montage test has three stages: investigating the crypt, identifying and finding Milivoj, and questioning Milivoj. You should only reveal the available challenges for each stage of the montage test when the heroes begin that stage, lest you spoil the mystery! And, of course, the investigation doesn't end once your heroes hit the success limit—let them play it out all the way through.
D1c. The Scene of the Crime
Father Lucian is glad to lead the heroes to the location of the crypt if prompted. Read:
A small pile of fresh wooden boards rests against the altar, a small pouch of nails sitting atop their surface. Not far away, the old wooden floorboards behind the crypt have been pried up and broken, with splintered edges jutting out at odd angles. Between them, a small, dark opening descends into a dark, dusty space.
The fresh boards and nails were delivered by Henrik. The opening is barely wide enough to allow one person to enter, and descends into the crypt.
St. Andral's crypt is a small, cramped chamber beneath the chapel, lying largely beneath the chapel's altar. If a hero enters the crypt, read:
You descend into a small, dark, damp chamber, the walls made of rough-hewn stone blocks stained with age and moisture. At the center stands a lonely stone slab, an empty, circular depression carved neatly into its surface.
The slab held the bones until Milivoj stole them.
The heroes can find the following information by investigating the area around the crypt:
- Investigate the floorboards: the heroes can find a torn piece of gray wool fabric snagged on a nail with a successful medium Reason test, and a line of rust-stained dirt smeared across a floorboard with a successful hard Intuition test.
- Investigate the interior of the crypt: the heroes can find several clumps of earth with a successful medium Intuition test. Each clump is in the shape of a large bootprint, and contains several blades of pale green grass and white flower petals.
- Investigate the altar or the stone slab: the heroes can find a few strands of dark black hair with a medium Intuition test.
The fabric was torn from Milivoj's shirt as he lowered himself down, and the rust was left when he used his shovel to pry up the floorboards.
The clumps of earth were left when Milivoj's boots hit the floor of the crypt. Father Lucian can inform the heroes that the petals are from the ramson plant, which grow in several patches in the church graveyard.
The hair is Milivoj's.
D1d. Interviewing Yeska
If the heroes choose to interview Yeska, Father Lucian asks them not to press them too hard for information. The child is still emotionally fragile from the death of their parents three months ago, and Father Lucian doesn't wish to harm their mental well-being over a mere suspicion of danger. (Yeska doesn't know that the bones have been stolen; Father Lucian has been careful to keep them away from the hole behind the altar.)
If one of the heroes asks Yeska whether they have told anyone else about the bones, he truthfully denies doing so.
Question Yeska: With an easy Presence test, if the heroes ask whether anyone might have overheard her conversation with Father Lucian, Yeska shares that Milivoj was also in the church at that time. Yeska, though alarmed by the direction of the conversation, can also share that Milivoj's tales of Strahd potentially attacking the church encouraged them to ask Father Lucian about the church's protection in the first place.
D2. Milivoj’s House
Milivoj’s house is located in the impoverished northwest quarter of Vallaki, a short walk from St. Andral’s Church.
Navigate Vallaki: Heroes must travel quickly and quietly, without alerting anyone who might warn Milivoj they're coming. Suggested Characteristics: Presence, Agility. Suggested Skills: Navigate, Sneak.
The muddy road that leads into the town’s northwest quarter is rough and uneven, chilled by a persistent fog that seems to cling to the soaked earth beneath your feet. As you move further from the town’s center, the streets narrow and the houses grow grimier and more dilapidated, the smell of damp wood and mildew filling your nostrils.
Your path leads you to a leaning, decrepit structure that seems to sag beneath its own weight. Its timbers are rotting, the windows cracked and filthy. At its front, a ramshackle wooden door stands slightly askew in its frame atop a small, mud-spattered porch.
If the heroes knock on the door, it’s answered a few moments thereafter by Jarzinka, Milivoj’s mother. Read:
The door groans open, revealing a gaunt, glassy-eyed woman standing on the other side. Her hair is matted with grease and hangs in knots across her shoulders, and a painted beaded necklace hangs around her neck, its colors faded and chipped with age.
Behind her, a trio of young children wrestle and shout as they roll across a cramped living space stuffed with old, threadbare furniture and an old, stained rug. Two other children—a near-adolescent boy with long, shaggy hair, and a freckled girl of similar age wearing cracked, oversized glasses—peer curiously around a pair of overstuffed, patchwork armchairs at the sight of you.
The woman at the door grunts, her hollow gaze scanning you expectantly.
The children in the armchairs are a twelve-year-old boy named Bogan and a ten-year-old girl named Zondra. The three children wrestling on the ground are named Lazlo (eight years old), Grilsha (seven years old), and Dargos (five years old).
Jarzinka is a woman of few words, and is annoyed because she has just finished the last of her dream pastries. If the heroes ask to speak with Milivoj, she turns to Bogan and Zondra, then grunts at them. The conversation then proceeds as follows:
- Bogan cheerfully informs the heroes that Milivoj is sick and doesn’t want to talk to anyone today.
- Find Milivoj: If the heroes succeed on a medium Presence test, Zondra turns and hollers, “Milo! Someone wants to speak to you.”
A few moments later, the nineteen-year-old Milivoj exits a swollen wooden door at the back of the room, with his three-year-old brother Jirko giggling delightedly from atop Milivoj’s shoulders and his four-year-old twin sisters, Victoria and Vasha, hanging from his biceps.
Roleplaying Information
Resonance. Milivoj should inspire scorn with his gruff, cynical, and stubborn personality, sympathy for his frustration at his parents' addiction to dream pastries, and endearment to him for his wholehearted dedication to provide for his siblings, no matter the cost to himself.
Emotions. Milivoj's most frequent emotions are annoyance, worry, frustration, boredom, bitterness, and cynicism, and (when with his siblings) compassion, mirth, and joy.
Motivations. Milivoj wants to provide for himself and his siblings.
Inspirations. When playing Milivoj, channel Katniss Everdeen (The Hunger Games), Arya Stark (Game of Thrones), and Carl Fredericksen (Up).
Character Information
Persona. To strangers, Milivoj is a quiet, gruff, and hardworking groundskeeper. To those he trusts, Milivoj is a loving and dedicated elder sibling, a frustrated and bitter son, and a desperate and confused young man.
Morale. In a fight, Milivoj would brandish his shovel in an attempt to get his attacker to back down, but would quickly surrender if seriously wounded. (If defending his siblings, however, Milivoj would fiercely and gladly fight to the death.)
Relationships. Milivoj is employed by Father Lucian Petrovich, secretly works for the coffin maker Henrik van der Voort, and is the eldest of nine children belonging to Oleg and Jarzinka, two dream pastry-addicted Vallakians.
D2a. Confronting Milivoj
Upon spotting the heroes, Milivoj’s face visibly falls, and he gently shakes Victoria and Vasha from his arms and sets Jirko down in Bogan’s lap.
Observe Milivoj: A medium Intuition test reveals his body language has grown tense, and that he is shifting uncomfortably. On a tier 2 result, Milivoj notices the hero's scrutiny and becomes defensive. The next test made to interrogate Milivoj takes a bane.
As Milivoj reaches the door, he tersely addresses Jarzinka as “Mother” and gives her a grudging nod. Jarzinka grunts and shuffles away from the door, disappearing into the room from which Milivoj came.
If the heroes inform Milivoj that they want to speak with him about St. Andral’s bones, he scowls, insists that he knows nothing about the matter, and attempts to close the door.
Open door: A hero can prevent Milivoj from closing the door with a successful medium Agility or Might test. (If Milivoj successfully closes the door, the heroes can make him open it again by making a sufficient nuisance of themselves, by succeeding on an easy Presence test, or by forcing the door down with a successful easy Might test.)
Question Milivoj: Milivoj denies any knowledge of the bones or their theft if asked about them outright. However, he claims to have seen a cloaked figure watching the church two days ago from an alleyway. (The description of the cloaked figure coincidentally matches the appearance of Ernst Larnak, Fiona's spy, though Milivoj doesn't know Ernst or the nature of his employment.) A successful medium Intuition test reveals that he is speaking slightly too quickly.
Montage Outcomes
If the heroes achieve a total success on the montage test (i.e., meet the success limit before the failure limit), any test made to convince Milivoj to admit to stealing the bones has a double edge. Award each hero 1 Victory.
If the heroes achieve a partial success on the montage test, their investigation has taken at least an hour, and one of Milivoj's neighbors has warned him that Father Lucian and some "serious-looking people" are looking for him. Any test made to convince Milivoj to admit to stealing the bones has a bane.
If the heroes encounter total failure on the montage test, their investigation has taken so long that Milivoj has had several hours to convert guilt into defensiveness. Any test made to convince Milivoj to admit to stealing the bones has a double bane.
Accusing Milivoj
If the heroes accuse Milivoj of stealing the bones and succeed on a medium Presence test (modified as above), Milivoj admits to stealing them as described in #D1. St. Andral's Church. Heroes who confront Milivoj with evidence from the crypt automatically succeed. Milivoj can't take the heroes to the coffin maker's shop himself, but notes that Father Lucian can lead them there.
If asked his motive for stealing the bones, Milivoj shares that he needed Henrik's money to feed his young siblings. He can also share that, after his father—a former Vallakian guard—was wounded in a recent wolf attack, both of his parents began regularly purchasing dream pastries from the peddler Morgantha outside of the gates. With both parents dependent on Morgantha's wares, Milivoj sees himself as his siblings' sole means of avoiding total poverty. (If asked, Milivoj can provide a basic description of the effects of dream pastries, as described in Dream Pastries.)
If informed that the bones may have been stolen to allow an attack upon the church, Milivoj dismisses the idea, insisting that the bones are just a "moldy old relic" and that "he doesn't have time to believe in fairy tales." He can also share that Henrik told him the bones were a powerless family heirloom, and that Henrik sought to recover them to honor his ancestor.
If he is later informed that Henrik's actions were directed by one of Strahd's vampire spawn, and that the theft of the bones could have allowed a slaughter at the church, Milivoj is overcome with anxiety, horror, and guilt. He prostrates himself before Father Lucian and begs for his forgiveness, offering to exile himself to the Svalich Woods if doing so will make up for the harm he has caused. (Father Lucian, of course, declines, tearfully embracing and forgiving Milivoj instead.)
D2b. Departing the House
Once Milivoj has admitted to the bones' theft, Father Lucian can lead the heroes to the coffin maker's shop. (He knows the owner, Henrik, well, and hopes that he can reason with the man.) If the heroes appear skeptical, Father Lucian—who has the statistics described in Priest of the Morning—reveals that he bears the holy symbol of Natalya Petrovna, his ancestor and a mighty conduit of the Lady, and promises them that he is more than capable of defending himself. If the heroes decline his offer, he offers them a vial of Holy Water: it's not much, he says, but maybe it'll help if the holy relic has been desecrated somehow.
If your heroes have no way of dealing holy damage and don't accept Father Lucian's help, the combat encounter in #D4c. Volenta's Trap will be much more difficult. If there's no conduit or censor among your heroes, and they don't already have some holy water, consider offering two vials instead of just one.
If the heroes suggest reporting the theft of the bones to the burgomaster, Father Lucian is reluctant to do so, fearing the possibility of raising a panic. With a successful medium Presence test, however, the heroes can convince Father Lucian to join them in reporting the theft to the baron, who dispatches four guards to arrest Henrik and retrieve the bones. Henrik surrenders himself without a fight, claiming that vampires forced him to steal the bones; he tells the guards that the bones are hidden upstairs, but he won't retrieve the bones himself for fear of being killed by the vampires. (If the heroes don't have Father Lucian with them, the burgomaster refuses to believe that the bones are responsible for the church's divine protection or to assist the heroes in recovering them.)
If the heroes report the theft to Baron Vallakovich and do not accompany his guards, the four guards gain access to the coffin maker's shop, but are slaughtered when they accidentally trigger Volenta's trap and alert the vampires to their presence.
One day later, Baron Vallakovich responds by sending Izek to summon the heroes to the Burgomaster's mansion, where he accuses them of causing his faithful guards to disappear and threatens to exile them from Vallaki. (The heroes can win back his good graces by promising to recover the bones themselves.)
D3. Arasek Stockyard
This scene takes place in Chapter 5: Area N5.
Arasek Stockyard is largely as described in N5. Arasek Stockyard (p. 115). However, while Rictavio's wagon is mostly covered by old and faded paint, the Carnival of Wonders sign on its side is brand new and fresh-painted.
If one of the heroes expresses an interest in breaking into the wagon, Father Lucian discourages them from doing so if he is present.
If a hero nonetheless attempts to unlock or force open the door to the wagon, the entire wagon suddenly rocks violently from side to side. The heroes can also hear the sound of something with large, heavy claws scratching against the interior of the wagon. (The rocking and scratches are made by the ghost of Erasmus van Richten, an Unquiet Spirit seeking to protect Sitarey by scaring visitors away.)
If the heroes successfully break the door to the wagon or pick its padlock, they find that the wagon’s interior contains a soft bed with comfortable wool blankets, shelves with gallery rails mostly containing books and old glass bottles, and a young hakaan woman—Sitarey—who is calmly knitting a mitten in stranded colorwork. (For more information about Sitarey, see Arc E - The Missing Girl.)
D4. Coffin Maker's Shop
This scene takes place in Chapter 5: Area N6.
The coffin maker's shop is largely as described in N6. Coffin Maker's Shop (p. 116). Henrik van der Voort, the coffin maker, follows the following schedule:
- In the morning, he sleeps in, remaining in bed in N6e. Henrik's Bedroom.
- In the late morning, he anxiously checks that the wardrobe containing St. Andral's bones hasn't been disturbed, and then prepares breakfast in N6d. Kitchen.
- In the afternoon, he builds coffins in N6c. Workshop.
- In the evening, he prepares an evening meal in N6d. Kitchen.
- At night, he sleeps in N6e. Henrik's Bedroom.
D4a. Entering the Shop
If the heroes attempt to access the shop through persuasion, deception, or intimidation, Henrik responds as described in N6. Coffin Maker's Shop. If the characters knock on one of the doors, Henrik shouts, "We're closed! Go away!" without opening the door. If the characters accuse Henrik of stealing the bones of St. Andral, he shouts again, "Go away! Leave me alone!"
Additionally, note that the windows are shuttered from the inside and the doors are barred. As such, the heroes cannot open a window or door by picking locks. Instead, the heroes can enter the shop by either of the following means:
- They can make a hard Presence test to intimidate or persuade Henrik into letting them in. Henrik can't be deceived into opening the doors.
- They can break down one or both of the barred doors with a successful hard Might test, or by destroying the doors (which have 6 Stamina). Doing so alerts Henrik, who comes to confront them. (Doing so doesn't alert Volenta or the vampire spawn, who merely assume Henrik has dropped a coffin or other wooden object.)
- They can use magic (e.g., peering under the door and using the Invisible Force perk or an elementalist's Practical Magic teleportation ability) to open the windows or doors from the inside. Doing so avoids alerting Henrik, who remains in his current location.
In any case, Henrik offers no resistance as soon as he sees that the heroes have entered the shop. Instead, he rightfully guesses that they have come to recover the bones and informs them of the bones' location (upstairs; Henrik left them in the wardrobe in his bedroom, but has been too afraid to go back up and check on them) and the danger of the vampire nest, as described in N6. Coffin Maker's Shop. In exchange, he pleads with them to protect him from the vampires, who he rightfully fears will butcher him for his betrayal. He won't retrieve the bones alone, but will accompany the heroes upstairs if demanded.
Henrik does not know that Volenta has secretly installed a number of traps throughout the upstairs, or that she has moved the bones to one of the coffins in the storage room. He assumes that the heroes will be able to quietly recover the bones, depart the shop, and escort him elsewhere to safety.
Heroes who attempt to ambush the vampires in N6f. Vampire Nest (p. 118) before recovering the bones must succeed on a hard group Agility test to approach the coffins and open them without awakening the vampires. If they succeed on this test, the combat encounter below begins with the vampires surprised. Otherwise, a woken vampire attacks intruders on sight, and initiative is rolled as normal.
D4b. Recovering the Bones
Henrik's Bedroom
This scene takes place in Chapter 5: Area N6e.
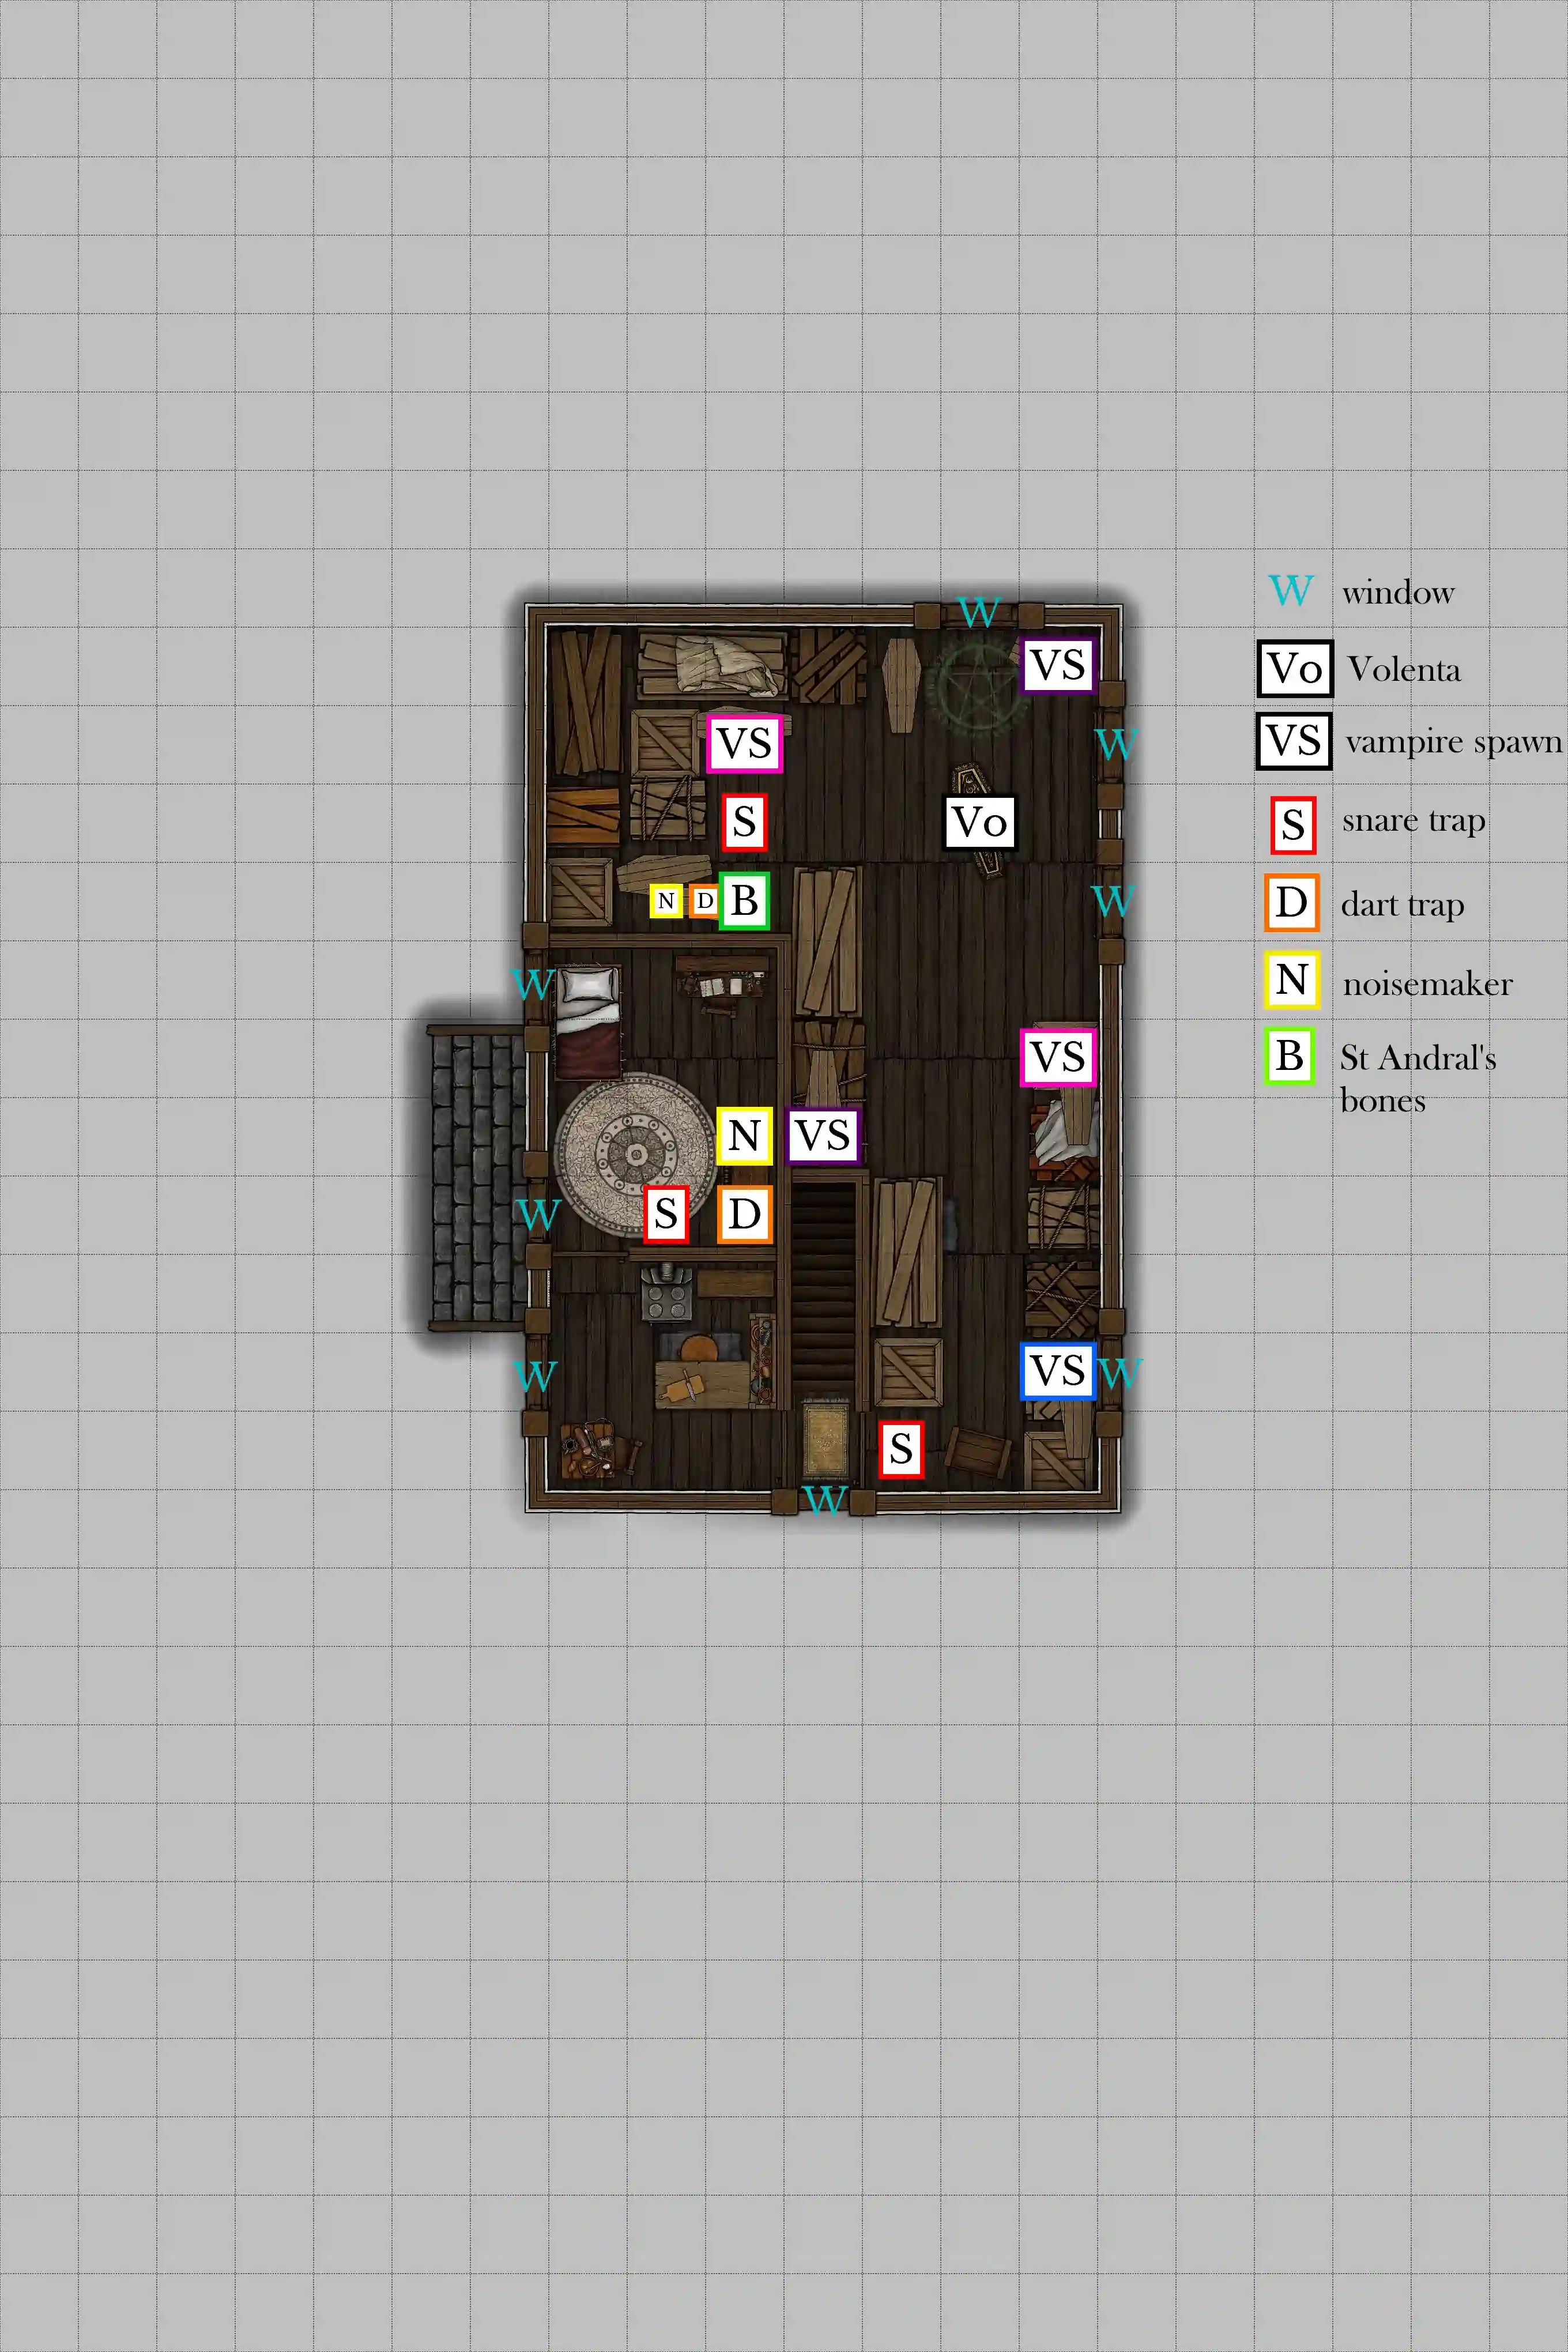
This room is mostly as described in N6e. Henrik's Bedroom (p. 117). The wardrobe in the southeast corner has a secret compartment in its base, requiring a successful medium Intuition test to find. Inside the compartment is a small sack containing some coins bearing the profiled visage of Strahd von Zarovich.
Volenta Popofsky has added several additional safeguards to the secret compartment, which serves as a decoy in case of Henrik's betrayal:
- a Dart Trap with poisoned needles, which triggers unless a particular wooden panel is pushed before the compartment is opened, and
- a hidden wire attached to the compartment's opening, which connects to
- a Snare Trap under the rug in front of the wardrobe, and
- a noisemaker at the base of the compartment shaped vaguely like the head of the toymaker Gadof Blinsky, including his jester’s cap and bells.
The poison dart trap can be identified with a hard Reason or Intuition test, and can be disarmed as described in Dart Trap. Triggering the poison dart trap doesn't wake the vampires.
The hidden wire can be identified before the compartment is fully opened with a successful hard Reason or Intuition test, and disarmed with a successful hard Agility test.
Opening the compartment without disabling the wire or unsuccessfully attempting to disarm the wire causes the noisemaker to loudly screech, “Is no fun, is no Blinsky!” repeatedly for 1 minute, alerting the vampires in N6f. Vampire Nest.
Volenta purchased the noisemaker from Gadof Blinsky of Blinsky Toys, described further in Arc E - The Missing Girl, several nights ago. Though tempted to kill him or take the toy by force, Blinsky's affinity for the macabre led Volenta to regard him as a kindred spirit, and she elected to spare his life on a whim.
If the heroes successfully retrieve the bones without alerting the vampires, Volenta discovers the bones to be missing shortly after she awakens at dusk that night. If Henrik is still within the shop, she disembowels and beheads him, then leaves his head staked on a spear leaning against the statue at the center of N8. Town Square (p. 119). In either case, Volenta then departs Vallaki for Castle Ravenloft, slinking back to the keep in shame.
Vampire Nest
This scene takes place in Chapter 5: Area N6f.
When the heroes enter this room, read:
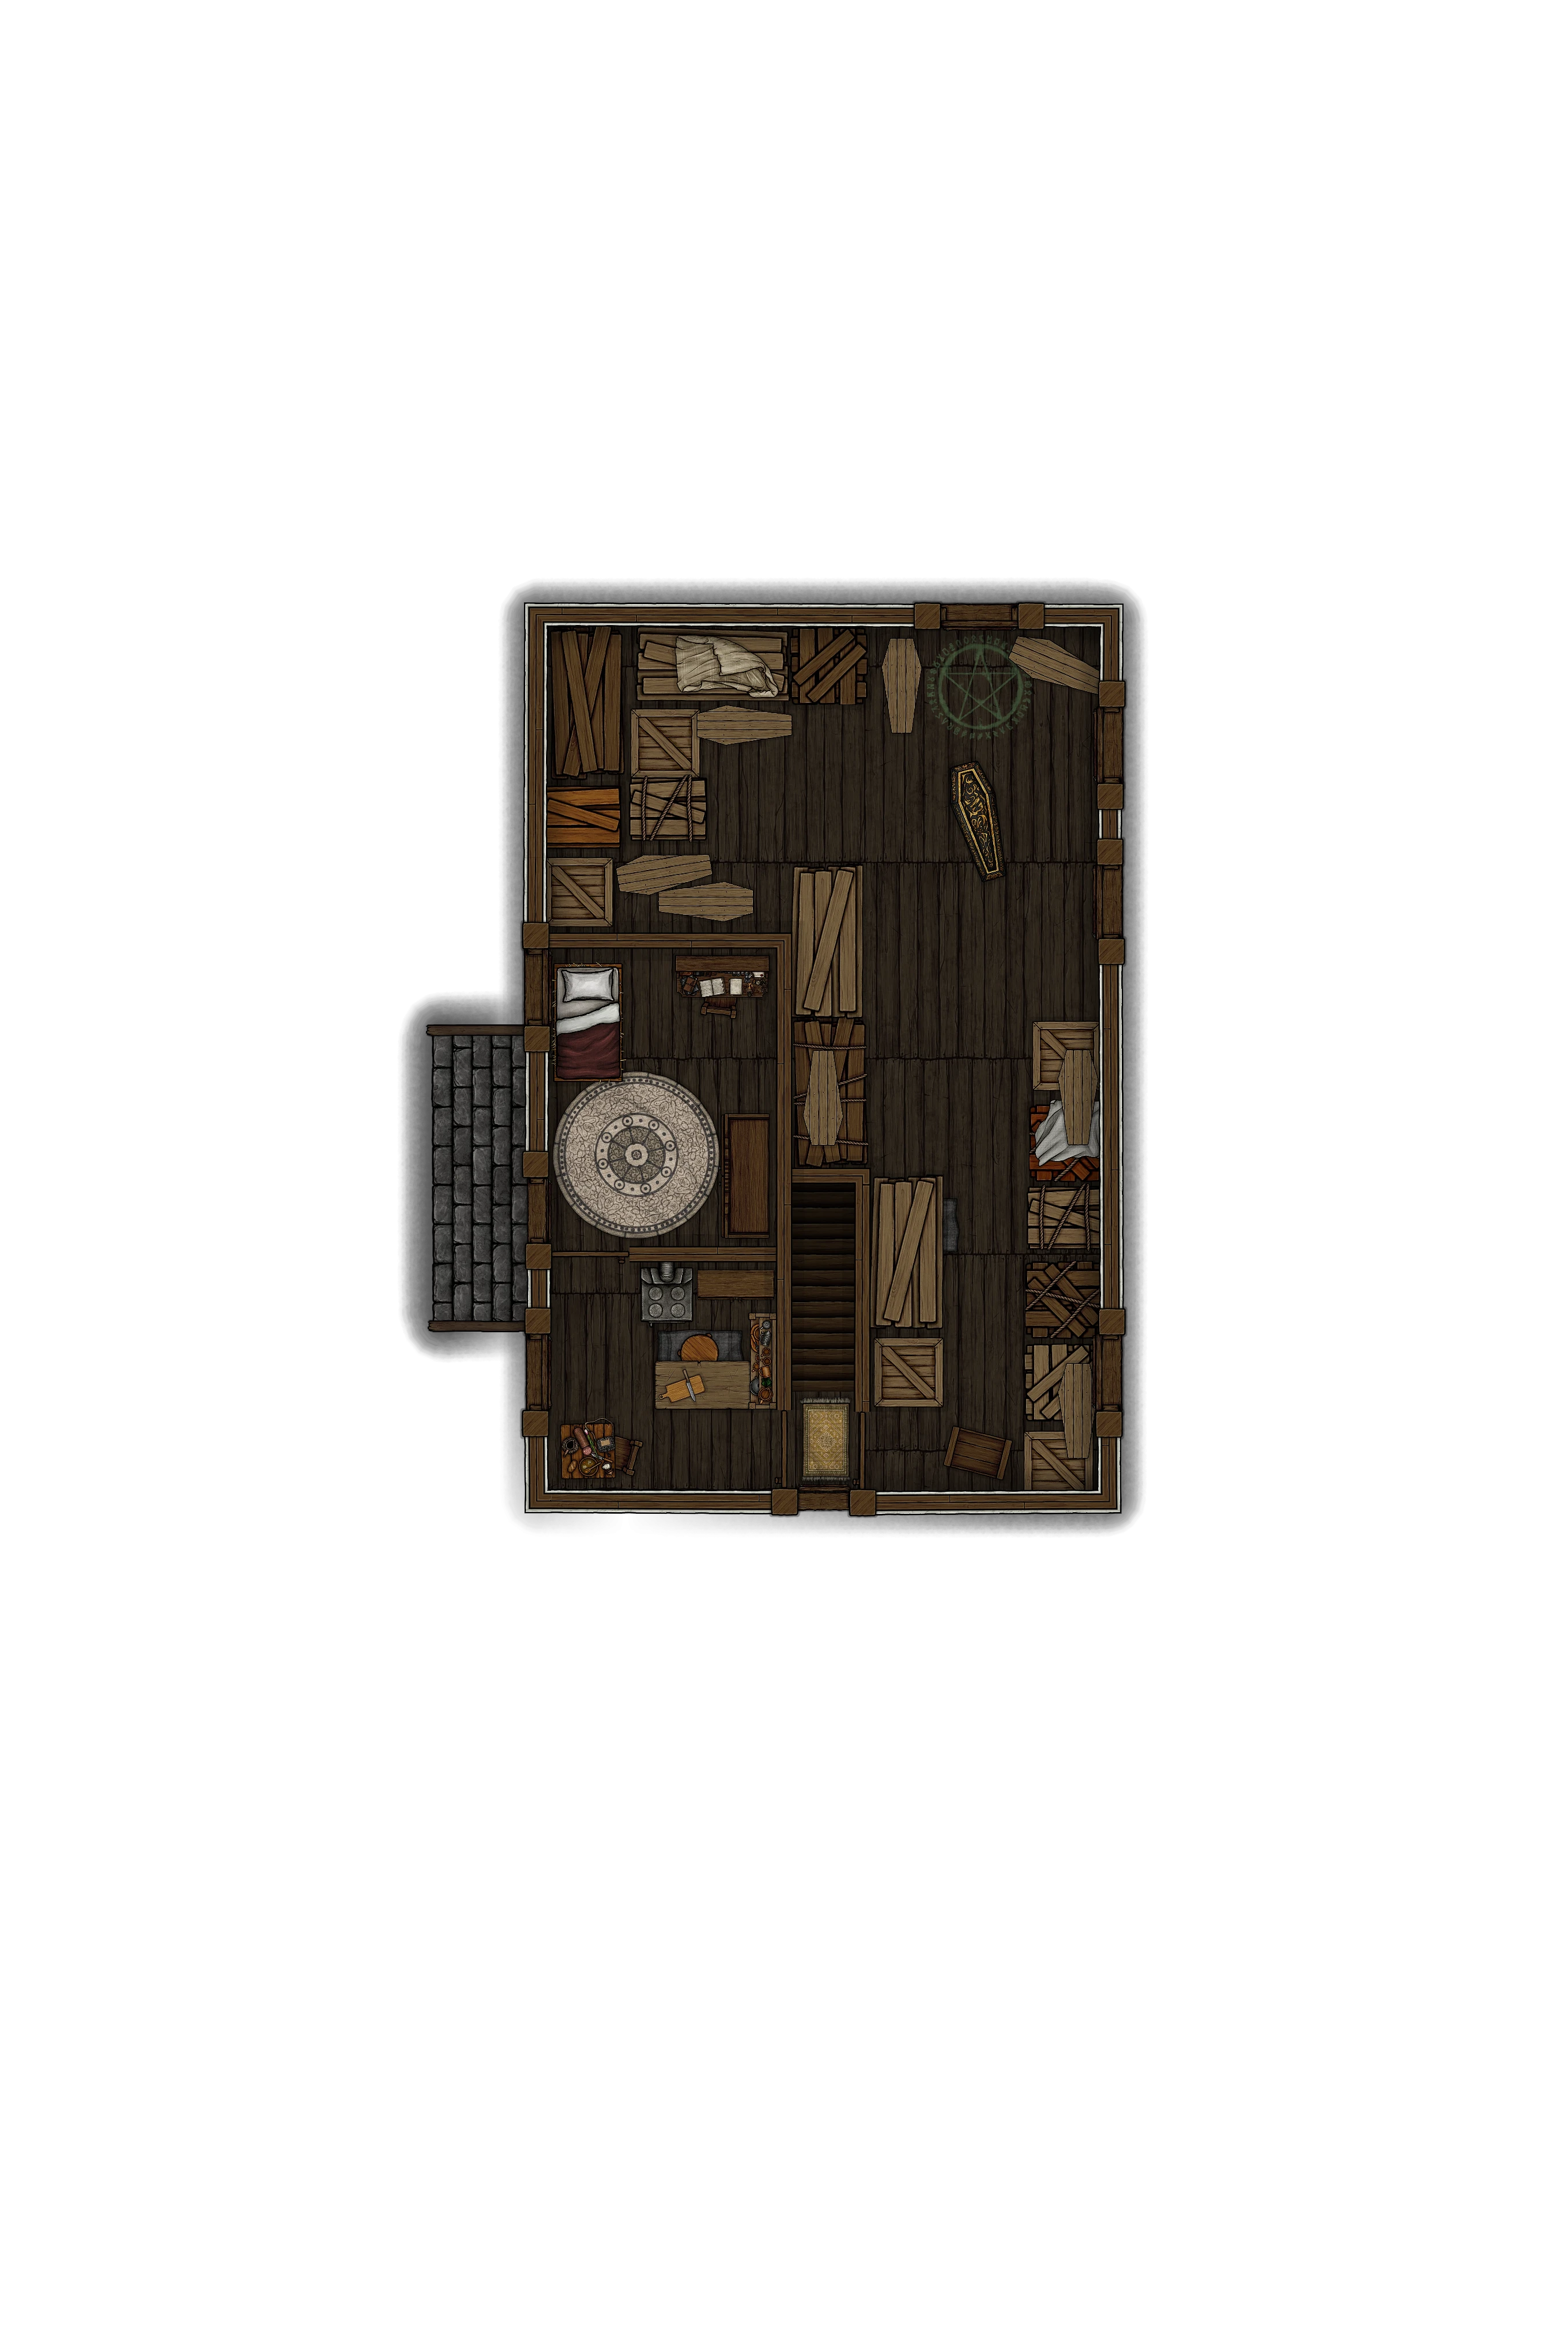
This large, drafty room is strung with cobwebs and takes up most of the upper floor. Stacks of wooden planks lie amid half a dozen coffins. Just beyond the coffins is a large faded green-tinged pentagram burned onto the floor at the edge of the room.
The coffins are packed with grave dirt from Castle Ravenloft, and contain several vampire spawn and Volenta Popofsky, one of Strahd's vampiric brides. One coffin, however, next to the north wall of Henrik's bedroom, contains the bones of St. Andral in a large sack.
The green pentagram is a remnant of Volenta's use of the teleportation brazier in K78. Brazier Room (p. 82). If asked, Henrik doesn't know what it signifies. However, he can share with the heroes that, one night shortly after he first met Volenta, a sickly green light flashed through the shop, with her vampire spawn companions exiting from N6f. Vampire Nest (p. 118) shortly thereafter.
Volenta has set several more traps in this room:
- a Snare Trap in front of the door to the stairs,
- another Snare Trap in front of the coffin containing St. Andral's bones, and
- a hidden wire in the coffin containing St. Andral's bones, which, upon opening the coffin, triggers
- a Dart Trap with large poison needles, and
- another Blinsky noisemaker.
Each of these traps can be detected with a hard Intuition test and disarmed with a hard Agility test. Triggering only one snare trap does not wake the vampires, but triggering both does. Disarming the hidden wire in the coffin disarms both the noisemaker and the dart trap.
If the dart trap triggers, the darts attempt to push the triggering creature directly north into a coffin, which contains one of the vampire spawn. If the hero is shoved into this coffin, the vampire spawn inside wakes and immediately attacks the heroes.
Volenta and the vampire spawn have cover while in their closed coffins.
Heroes who attempt to ambush the vampires in N6f. Vampire Nest (p. 118) before recovering the bones must succeed on a hard group Agility test to approach the coffins and open them without awakening the vampires. If they succeed on this test, the combat encounter below begins with the vampires surprised. Otherwise, a woken vampire attacks intruders on sight, and initiative is rolled as normal.
D4c. Volenta's Trap
If the heroes make too much noise, as described above, Volenta and her loyal vampire spawn arise to confront them, either by forcing their way into N6d. Kitchen or (if the heroes have already exited N6e. Henrik's Bedroom) by obstructing the heroes' path down the stairs. When the vampires appear, they clamber across the walls before dropping down to the heroes’ level, with Volenta crouching upside-down on the ceiling behind them.
Roleplaying Information
Resonance. Volenta should inspire revulsion with her obsession with pain and gore, discomfort with her sadistic personality, and a strange sort of flattery with her flirtatious—if eccentric—attitude.
Emotions. Volenta most often feels amused, curious, irritated, bored, fascinated, enraged, and gleeful.
Motivations. Volenta wants to impress Strahd and earn her place as foremost among his brides, to satisfy her frequent sadistic urges, and to find novel ways to cause suffering and pain through tinkering and innovation.
Inspirations. When playing Volenta, channel Jinx (Arcane), Ty Lee (Avatar: The Last Airbender), and Harley Quinn (Batman).
Character Information
Persona. To strangers, Volenta is an excitable, impulsive, and trigger-happy sadist with a flair for invention and innovation.
Morale. In a fight, Volenta would gleefully relish the opportunity to test her custom-made weapons on hostile subjects—and, when pushed far enough, to tear those subjects apart with her bare hands and teeth.
Relationships. Volenta is fanatically loyal to Strahd von Zarovich, and views his other brides and consorts—especially Anastrasya, Ludmilla, and Escher—with deep resentment, jealousy, and suspicion.
Volenta uses the vampire spawn with her as cover, placing them between her and the heroes. She then greets them as follows, providing them with an opportunity to respond each time:
- Volenta addresses the heroes as "her lord's new toys" with amusement and disbelief.
- She claims that they're "less impressive" than she'd expected, and boasts that neither they nor "Ludmilla, Anastrasya, or her lord's skinny new plaything could hold a candle to her vision." (The "skinny new plaything" is referring to Escher.)
- She insists that the heroes couldn't stop her scheme if they tried. "Once I make the pews of your little church run red with blood," she raves, "my beloved will recognize the real gem of his realm—me!"
- She observes that it's lucky that they're in a coffin shop, adding, "After all, they'll need somewhere to put your parts when I'm through with you." She then directs the other vampires to attack.
Encounter Difficulty: Hard
Victories Awarded: 2
Expected Party: Five heroes at level 2 with 1 Victory, and one retainer (Father Lucian, Priest of the Morning)
Enemies:
| Group | Creatures |
|---|---|
| 1 | Volenta, Vicious Shadow |
| 2 | Two Barovian Vampire Spawn |
| 3 | Two Barovian Vampire Spawn |
| 4 | One Barovian Vampire Spawn |
Balancing:
If you have fewer or more than 5 heroes (plus Father Lucian), modify the encounter in the following ways:
| Number of heroes | Modification |
|---|---|
| 3 | Remove three vampire spawn from the encounter. |
| 4 | Remove one vampire spawn from the encounter. |
| 6 | Add one vampire spawn to the fourth initiative group. |
| Ireena is also present | Add one vampire spawn to the fourth initiative group. |
| Father Lucian isn't present, and the heroes have no abilities that deal holy damage | Remove one vampire spawn from the encounter. |
Remember that vampires and other creatures in Barovia are unaffected by Barovian daylight, as described in Sunlight in Barovia (p. 24).
1. Volenta
Volenta begins combat by designating a hero as her rival—preferably a shadow, conduit, or censor, in that order—then using her Check Out Our Loot malice feature to lob a firebomb at the heroes. Afterward, she uses Poison the Blade before targeting weak-looking heroes with her Swift Serration.
If Father Lucian is present, Volenta prefers to target the heroes. As she fights them, she taunts Father Lucian gleefully, noting, "I'd intended to rip out your throat in front of your cute little congregation, but I guess decorating the church steps with your friends' heads and entrails isn't a bad second place!"
Volenta flees from combat if she is winded, teleporting away from the fray after using Swift Serration if possible. (The other vampire spawn don't accompany her, and fight to the death.) If she can't effectively flee the encounter (because she's slowed, for instance) she resorts to using her Exsanguinating Bite. Remember that, without sunlight or running water, Volenta can't be truly killed!
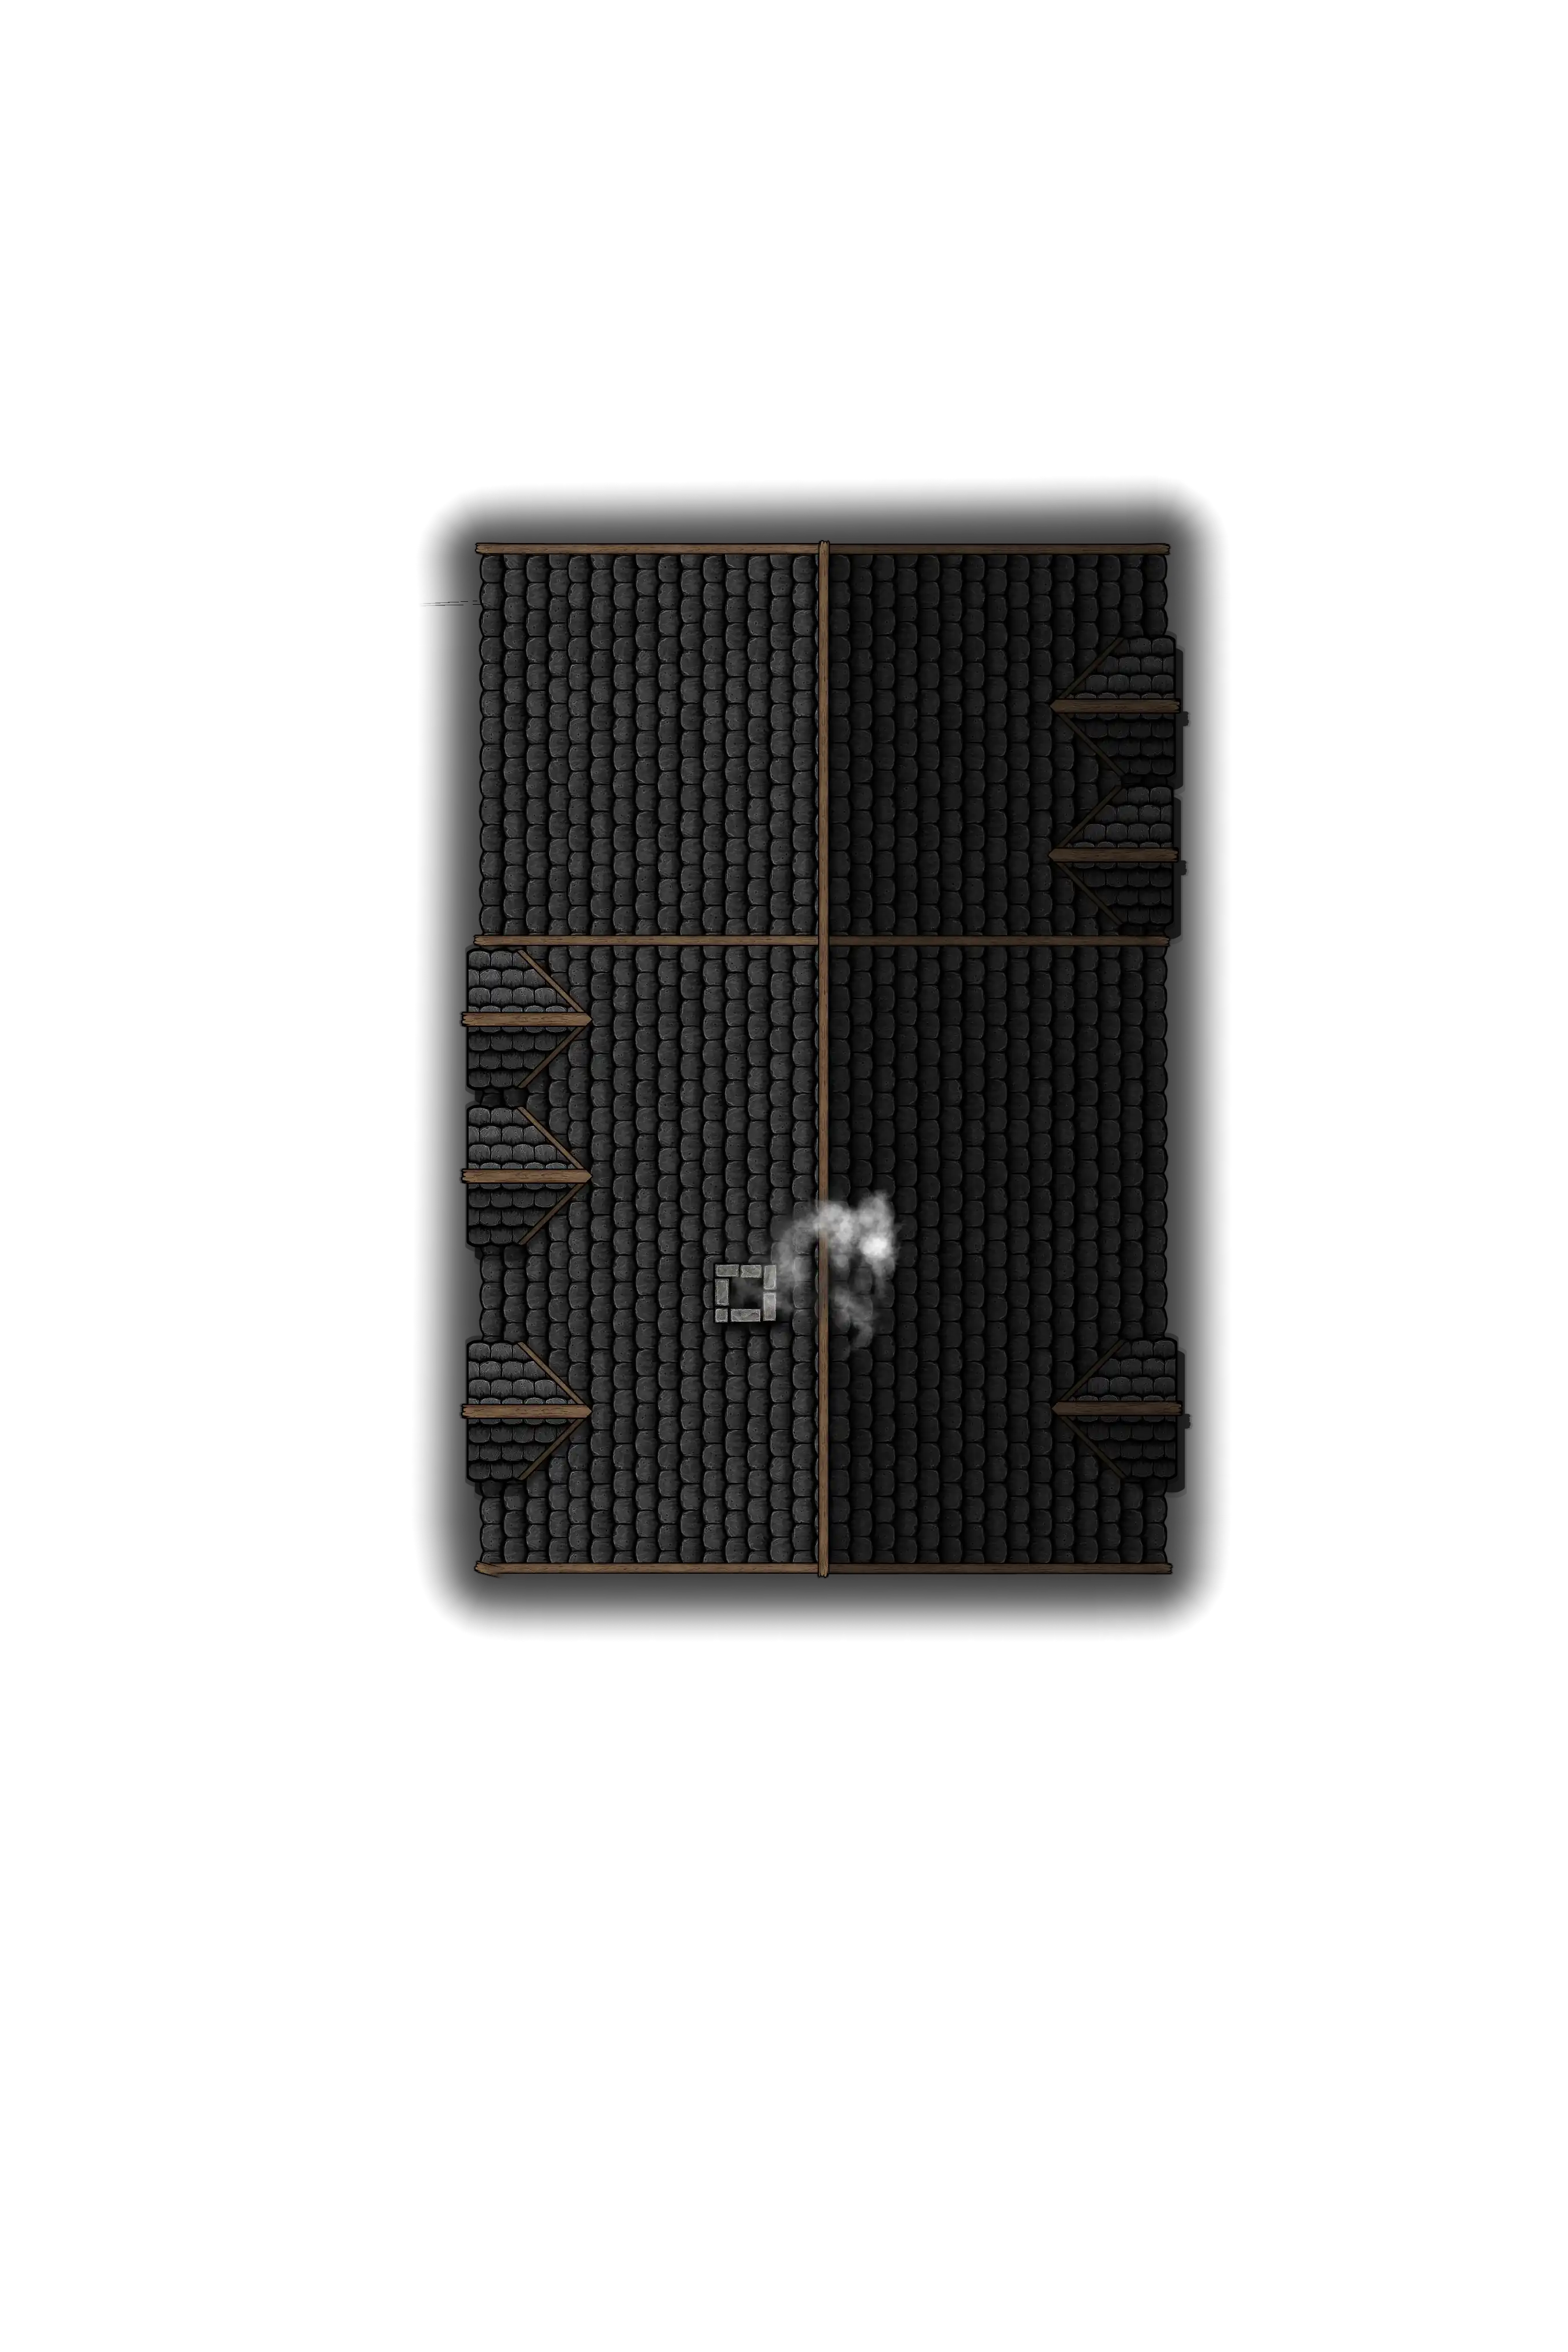
When Volenta flees, she smashes through a nearby window and gallops across the rooftops like a four-legged beast. As she flees, she snarls, “You think your precious little church can keep you safe? He'll burn down the rest of Vallaki to get to you, and kill the rest of this stinking vermin to force you out!” She then sneers at the heroes and promises to see them again soon before vanishing from sight behind a chimney.
2. Father Lucian
In combat, Father Lucian uses his Thunder of Heavens ability to damage vampires who seem close to death and allow heroes with low Stamina to spend a Recovery. He stands as near to the front lines as possible while remaining behind full cover, seeking to ensure that any attacking vampire spawn will be hindered by his Stalwart Guardian feature. He uses his maneuver to Catch Breath if he is winded, Aid Attack if he is adjacent to an enemy, or Hide if he is neither.
Because Volenta and her vampire spawn prefer to target the heroes instead of Father Lucian, it's unlikely that Father Lucian will be reduced to 0 Stamina in this battle.
However, if he is, remember that retainers (like heroes) become dying at 0 Stamina and die at their negative winded value. Father Lucian has six Recoveries and dies at -15 Stamina.
3. The Vampire Spawn
The Barovian Vampire Spawn fight in pairs. First, one Grabs a weak-looking hero, then drags them out of the windows and onto the rooftop, converting their main action into a maneuver to use Vampire Celerity if necessary. The second spawn then uses their own Vampire Celerity to join their partner on the roof and target the grabbed hero with Exsanguinating Bite.
If more heroes climb onto the roof, the vampires on the roof drop or shove their grabbed heroes off the roof onto the ground, then drop safely to the ground (thanks to their 3 Agility) and continue biting.
The fifth vampire spawn focuses on getting and protecting the bones once they are revealed.
4. The Bones
The sack with St. Andral's bones is a size 1S object. If any hero (or any retainer) has the bones of St. Andral, the vampires use their maneuvers to attempt to Grab the bones. Heroes (and retainers) in possession of the bones can use a maneuver to throw the bones to an ally to whom they have line of effect.
5. Terrain
The walls of the shop are made of wood. Much of N6f. Vampire Nest is occupied by crates and piles of wood, which are half a square tall and provide cover but do not block line of effect.
The windows on the north, east, and south sides of the shop are shuttered, as are the windows in Henrik's living space. (There is no glass in the windows, just wooden shutters.) A creature can open or close the shutters of a window as a free maneuver, or destroy the shutters completely as a maneuver.
The first floor of the coffin shop is 2 squares tall. The second floor is also 2 squares tall at the sides, but the roof slopes up to a height of 3 feet above the center of the floor.
On the roof, the dormers provide cover for creatures on the same half of the roof, but don't block line of effect. The chimney similarly provides cover for creatures on the west half of the roof. The central ridge of the roof is 1 square above the west and east edges of the roof, and thus provides high ground for creatures standing atop it and blocks line of effect for creatures on opposite sides.
6. Maps
Maps made by me (Emi Miura) using Dungeondraft with Forgotten Adventures assets.
Ending the Encounter
The encounter ends when the heroes have the bones of St. Andral and Volenta is winded (upon which she flees, as described above); in this case, award each hero 2 Victories. If things are going very well for the heroes and the players seem excited by the prospect of kicking more vampire ass, you can play out the rest of the combat turn-by-turn. Otherwise, the party loses a number of recoveries equal to the number of surviving vampire spawn, and the players narrate how they cinematically defeat the spawn.
Since the heroes are likely going into this fight without many Victories, they won't have consistent access to their highest-damage abilities. The vampire spawn are 4th-level monsters, and can both hit hard and heal themselves with their signature abilities. Fighting to the death is likely to be an unfun slugfest. I wouldn't recommend it!
Alternatively, if the heroes exit the encounter map with the bones of St. Andral but Volenta isn't winded, award each hero 1 Victory. Volenta and any surviving vampire spawn kill Henrik, leave his head on a pike in Vallaki's town square, burn the coffin shop to the ground, then return to Castle Ravenloft.
If the heroes fail to retrieve St. Andral's bones, the holy wards of St. Andral's Church fall at dawn on the day of St. Andral's Feast, and Volenta and the spawn (including replacements for any spawn slain at the coffin shop) descend immediately to slaughter the dozens of Vallakians attending the feast-day service.
D5. Retrieving the Bones
If the heroes and Father Lucian successfully return the stolen bones to St. Andral’s Church by dawn on the day of St. Andral's Feast, Father Lucian thanks the heroes and invites Ireena to remain under their protection for as long as she desires. Ireena then sleeps at St. Andral's Church each night until the party departs Vallaki in Arc J - The Stolen Gem.
D6. Rahadin's Visit
At dusk on the first night after the bones have been restored and Lady Fiona Wachter has assumed power in Arc F - Lady Wachter's Wish or following Arc G - The Strazni Siblings, Rahadin, Strahd's chamberlain, arrives in Vallaki. He then commands the town guard to arrest Milivoj and Henrik and bring them to the town square for judgment. (Because of Lady Wachter's standing orders to obey the laws of Castle Ravenloft—so long as they do not bring harm to the innocent people of Vallaki—the guards at the gates do not disobey.)
Shortly after Rahadin arrives, a red-faced, sobbing Yeska approaches the heroes and pleads with them to quickly come to the town square. Milivoj, she tells them, has been taken prisoner by the town guard, and is set to be executed. (Father Lucian, who has already gone to the town square to call for clemency, sent Yeska to find and summon the heroes when Milivoj was taken from the church grounds.)
D6a. The Trial
When the players arrive in the town square, which is largely as described in N8. Town Square (p. 119), they find a small crowd of onlookers has gathered around the platform holding the empty stocks. Atop the platform stands Rahadin, flanked by two pale-faced Vallakian guards. One of the guards is bending down and arguing with Father Lucian, who stands at the base of the platform.
On either side of Rahadin kneel Milivoj and Henrik van der Voort, their legs and feet bound with rope. Henrik is weeping with fear, while Milivoj is staring vacantly at the ground. Not far away, Milivoj's sobbing seven younger siblings, described further in #D2. Milivoj’s House, struggle to ascend the platform stairs to reach him as two more guards block their path.
Father Lucian and Milivoj's siblings are grateful to see the heroes upon their arrival. Father Lucian asks the heroes to help "stop this awful tragedy," noting quietly that Milivoj may have made mistakes, but hardly ones deserving of death.
If confronted, Rahadin can coldly share that Milivoj and Henrik have been found guilty of crimes against Vallaki and its people.
If the heroes demand to know which crimes Milivoj and Henrik have committed, or at another suitable point during the proceedings, the crowd parts as Lady Fiona Wachter arrives, flanked by four guards and four cultists. Lady Wachter then demands Rahadin inform her of Milivoj and Henrik's crimes. "If the servants of Castle Ravenloft presume to commandeer my guards without my knowledge or permission," she fumes, "I have that right, at least."
Rahadin then reads aloud the following proclamation:
I, Strahd von Zarovich, Lord of Barovia, hereby find Henrik van der Voort of Vallaki GUILTY of the following charges: conspiracy to commit burglary; conspiracy to commit theft; accessory to theft; and receiving stolen property.
I further find Milivoj of Vallaki GUILTY of the following charges: trespassing, destruction of property, conspiracy to commit burglary, burglary, and theft.
It is therefore ordered that each receive suitable punishments as befitting the circumstances and nature of their crimes, to be determined and carried out by the Chamberlain of Castle Ravenloft with all reasonable haste.
The proclamation is signed and sealed by Strahd.
As the Chamberlain of Castle Ravenloft, Rahadin informs the heroes, he has determined that the sentence for these crimes is death—unless any are willing to speak in the convicted's favor, presenting mitigating circumstances that alleviate the severity of their transgressions. (Lady Wachter will take no action to bar Strahd's justice, but supports the heroes in their efforts if friendly toward them.) To save Henrik and Milivoj, the heroes must engage in a negotiation.
Interest: 2
Patience: 3
Impression: 5
Native Language: Illyvric
Motivations
- Higher Authority: Rahadin is unswervingly loyal to Strahd, and believes Strahd to be the ultimate authority. Rahadin will never question Strahd's orders. Arguing that Henrik committed his crimes subject to coercion and duress by Volenta, an ostensible agent of Strahd himself, appeals to this motivation.
- Order: Rahadin wants to see habitual criminals punished and law-abiding citizens of Barovia basically left alone. Arguing that Henrik and Milivoj have no criminal history and were manipulated into crimes appeals to this motivation.
- Power: Rahadin wants to see Strahd's power grow beyond measure, which requires a fearful, faithful populace. Arguing that Henrik and Milivoj have been "scared straight" by the trial and are unlikely to commit crimes again, or that Strahd would appear more powerful by showing mercy, appeal to this motivation.
Pitfalls
- Justice: The laws of Barovia (such as they are) protect, but do not bind, Strahd's consorts and servants, and bind, but do not protect, ordinary Barovians; Rahadin believes this state of affairs to be right and just. Appealing to moral principles of equality under the law to argue that Volenta should be punished along with Henrik and Milivoj invokes this pitfall.
- Revelry: There is no place for fun or joy in Rahadin's life, only service. Arguing that the theft was a harmless prank invokes this pitfall.
- Freedom: Rahadin believes wholeheartedly that a world without Strahd's laws would be nothing but chaos. Arguing that theft or trespassing are just no big deal invoke this pitfall.
The heroes might argue the following mitigating circumstances:
- Henrik: Henrik committed his crimes subject to coercion and duress by Volenta, an ostensible agent of Strahd himself. Henrik is also unlikely to commit his crime again, has no criminal history, and committed no violent act against any person. Additionally, Henrik cooperated with the heroes when confronted at the coffin-maker's shop.
- Milivoj: Milivoj's actions were driven by the necessity of his family's poverty, rather than by malice. He was also ignorant of the implications of stealing the bones, and was manipulated by Henrik into doing so. Like Henrik, he has no criminal history and committed no violent act against any person.
The heroes can also argue that either character has shown sincere remorse for their actions.
Negotiation Outcomes
When the heroes conclude their arguments for each prisoner, the negotiation can have the following outcomes.
Interest 5: Rahadin agrees to free Henrik without punishment, and agrees to a moderate sentence for Milivoj. Each hero earns 1 Victory.
Interest 4: Rahadin agrees to a light sentence for Henrik and a heavy sentence for Milivoj. Each hero earns 1 Victory.
Interest 3: Rahadin agrees to a moderate sentence for Henrik and a severe sentence for Milivoj.
Interest 2: Rahadin agrees to a heavy sentence for Henrik and an extreme sentence for Milivoj.
Interest 1: Rahadin agrees to a severe sentence for Henrik but will not accept anything less than Milivoj's death.
Interest 0: Rahadin declares the trial over and sentences both prisoners to death.
Sentencing
Once the heroes have convinced Rahadin to decrease a prisoner's sentence, he then invites the heroes to suggest a suitable sentence. If the sentence they suggest is too light, he informs them and counters with an alternative suggestion of his own.
Suitable punishments for each sentence include:
- Extreme. Life imprisonment in Castle Ravenloft. (Rahadin takes the prisoner to the castle dungeons.)
- Severe. Mutilation. (Rahadin removes the prisoner's dominant hand.)
- Heavy. Branding. (Rahadin commands a guard to retrieve and light a torch, which he uses to heat an iron signet ring that bears the image of Castle Ravenloft—the symbol of his office. He then uses the hot ring to brand the prisoner on the neck.)
- Moderate. Flogging. (Rahadin commands a guard to fetch a whip, then delivers the agreed-upon number of lashes himself.)
- Light. A fine. (Rahadin directs the prisoner to pay a fine of the agreed-upon sum, to be paid to the town coffers. If the prisoner cannot afford to pay it, Rahadin also sentences him to forced labor in the town's service until he has paid off his debt.)
Rahadin does not deliver any sentence until all have been agreed upon. If the heroes prove intransigent or appear to be stalling, Rahadin warns them that his patience is not infinite, and that he will choose and proceed with a suitable sentence unless the heroes can provide new evidence—not new arguments—mitigating the severity of the prisoners' crimes. "If any person interferes," he warns, "I will not hesitate to incapacitate them. I answer to none but the master of Castle Ravenloft, and you will not obstruct the exactment of justice this night."
If the heroes appear horrified by Rahadin's chosen sentence, he coldly reminds them that the prisoners have been found guilty of conspiring to steal from a holy church. "My lord's subjects often claim he lacks appreciation for the sacred," he says. "It seems, perhaps, that he is the only one with any appreciation at all."
If the heroes appear unpersuaded, Milivoj tells them hoarsely, "Please, don't do anything foolish on my behalf. I did something wrong, and I'll accept any punishment. Just so long as my siblings don't suffer." (If punished with branding, flogging, or mutilation, Milivoj grits his teeth and stifles a roar of pain, but refuses to cry out and give Rahadin the satisfaction.)
If any heroes appear likely to obstruct Rahadin's efforts to carry out a sentence, Lady Wachter quietly pleads with them not to be foolish. "He is the chamberlain of Castle Ravenloft and Von Zarovich's right hand," she insists. If the heroes have successfully bartered Rahadin down from execution, she adds: "You've already saved lives today. Don't trade your own for a doomed endeavor. Vallaki needs you."
If the heroes actually attempt to obstruct Rahadin's efforts to carry out that sentence, he attacks. Rahadin does not play fair here, and neither should you; he attempts to daze as many heroes as possible with Doleful Visions, then focuses fire on a single hero at a time, knocking them unconscious before moving on to the next. Immediately before he delivers the final blow, he intones, "I find you guilty of obstruction of justice, and sentence you accordingly." While the hero is unconscious, he then uses his saber to sever a finger from the hero's non-dominant hand. He then delivers Henrik and Milivoj's sentences.
Rahadin is a level 4 solo monster, and at this stage the heroes should be level 2, so it's unlikely they'll defeat him. If something really unexpected happens—the heroes somehow manage to get all the way to level 3 before the trial, for instance, or a hero rolls three crits in a row—and Rahadin seems to be in danger of losing, recall that he has allies. His ghostly steed fights by his side. At the beginning of the second round, Lady Wachter, who uses the Fiona Wachter, Follower of Ezra statblock and captains a squad of Human Death Acolytes, intervenes to try to prevent the heroes from further attacking Rahadin, directing the eight guards present to restrain the heroes. At the beginning of each of the next two rounds, another squad of eight guards arrives. Though Ireena fights with the heroes as usual, she too begs the heroes to reconsider, reminding them of the awful consequences when the village of Barovia rebelled against Strahd.
If, against all odds, the heroes reduce Rahadin to less than 100 Stamina, he mounts his ghostly steed and retreats. Lady Wachter immediately banishes the heroes from Vallaki, reproaching them for endangering the innocent citizens of the town with their recklessness. Strahd's agents pursue Henrik and Milivoj relentlessly, delivering their sentences by any means necessary.
Once Rahadin is satisfied justice has been done, he mounts his ghostly steed once more and departs Vallaki for Castle Ravenloft.
D6b. Renown
When the public trial concludes, the heroes' Renown increases by 1.
Design Notes: St. Andral's Feast
Van Richten's Wagon. Some details have been changed about Van Richten's wagon to align with his updated lore. This is the same wagon he used when he was an ordinary doctor—it served as transportation, mobile pharmacy, and makeshift operating room.
Traps and More Traps. Several traps—about a montage's worth—have been added to the coffin maker's shop and the bones of St. Andral have been moved, both to prevent the heroes from getting a "free" Victory and to encourage the heroes to fight Volenta and company.
An Invitation to Dinner. Some players, presented with a sandbox, will try and do everything all at once. To avoid presenting too many options at the same time, and to avoid accidentally enticing the heroes to visit Castle Ravenloft while level 2, the delivery of the dinner invitation has been delayed to the night after the full moon, when the heroes have (likely) just finished Act II. I think this also fits better narratively—Act III is when the heroes transition from tackling local problems in Vallaki to moving directly against Strahd.